Drumming Serenity in the Studio - By Rachel Rothwell


Booking into the recording studio for the first time is daunting as hell and from one drummer to another, I think its safe to say that we have the hardest job. Drums are the first instrument to go down, which means there is (usually – you’ll see below) no track to follow. It’s just you, the click and the big red record button.

So here are a few things I have found that make life a little easier and prepare you for studio time. (I like to bullet point, so be prepared)
1.This will come up a lot but practice. Obviously you need to know the songs but work on you stamina. Studio recording is not like live performances where you put your life and soul into one run of the set. Its time consuming and you can be playing the same tune over and over again before moving onto the next, so make sure you can play the last take as strong as the first. To do that you need to practice; do rudiments, play covers, play your songs on repeat and build up that stamina.
- Practice the songs solo. Studio recordings aren’t cheap so the longer it takes you to get the tracks down the more expensive it is going to be and considering the drums take the longest to track, your band is not going to be chuffed if you go over schedule! It’s ok to have the tunes nailed when you are playing with your band. But can you do it when there is nothing else going on?

It’s such a different feel playing solo, no other instruments or vocals to help you keep track of where you are in the song. It’s just you and the click. So practice the structure of the song until you know them inside and out. Count out the bars for the intro, verse, chorus etc., write notes or write the drum score if you can, find whatever works for you. For example, I was recording one song where the drums were not the hero of the story and the beat was more or less the same throughout. This was hard to keep track of by just counting bars, so what helped in that situ was to write out and learn the lyrics. (Just be careful not to sing aloud whilst recording, and yes I have done this before) –
Remember, you are setting the scene for the rest of the band to play to so the structure is super important to get right and again time is money, so nobody wants a re-take.
- On the day it’s always a good idea to take another band member with you; have them listen along as you’re recording to make sure all the parts are there, in the right place and for the correct duration of time.
- Practice to a click track – the dreaded click track, you either love it or hate it. Recording to a click can be terrifying if it’s not something you are used to. So don’t leave the first time for the studio. Get comfortable with the click; make the click your new best friend. Set yourself up and practice, this can be as easy as a pair of headphones and your phone as there are plenty of click track apps to use. Set your tempo, check the levels (make sure it’s loud enough to hear when you’re playing) and practice, practice, practice.... and then practice some more!

When you first play to a click, straight away you will feel any parts of the song that you naturally speed up or slowdown on. Notice these and practice transitioning in and out of these parts. Also remember the click is just a guide, it’s there to help not hinder so don’t fixate on it too much or you will get lost in it. If you are struggling to keep on the click, slow it down, break the song down into parts and work on each bit separately, and remember when the click fades into your playing, your right on time!
- Another little tip on clicks – they are all different – when I am in the studio I find a softer shaker click is easier to follow than a harsher sound beep or something that sounds similar to the kit. Some clicks are so intense they add pressure just from the noise, and others can sound so similar to the kit that it’s off putting. So play around with what click suits you best
- If you can and have the equipment, record yourself prior to the studio. Listen back and it will highlight any parts that aren’t as tight as you think they are and work on these parts.
- Use a guide track in the studio – if you are recording a song with a similar beat for a long time, or are struggling to get the changes correct, ask your guitarist to put down a guide track for you. This will make your job a whole lot easier, especially if playing solo is not something you are used to. The guide track will then be layered over the click and you will play to both.
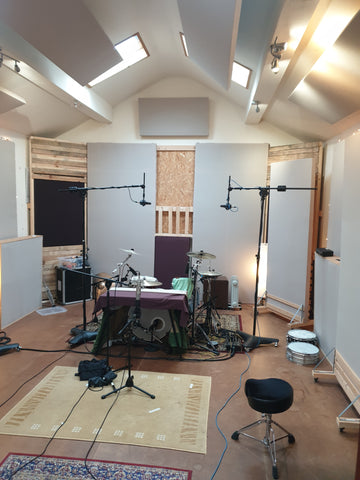
4.. The drum set up. Be prepares for your kit to be positioned slightly different when your are in the studio due to the many mics and equipment that will surround it. For example, one difference will possibly be the positioning of the cymbals, especially if you use multiple crashes. For the mics to pick up a clear more defined sound from each cymbal, its better to have these as far apart from each other as possible while still being comfortable to play. So if you have two crashes that usually face inwards towards the centre of the kit, try swivelling them outwards so one is positioned down the left side and one down the right giving them space to breathe in the middle. Practice your beats like this, then when it comes to studio day you are more comfortable with the layout and i guarantee your producer will thank you for it.
Focus on where you are hitting the skins, is it in the middle? Remember there will be mics above each drum and you don’t want to be hitting these expensive pieces of equipment. Practice being consistent in where you hit the drums. This will also help with the dynamics if the sound as you want each beat to be the same volume and tone.
- Keep it simple. We all love to play epic beats, whether your style is full on and fast double bass drum until we die, quirky as hell linear beats, drum solos every chance you get or sweet fills on every transition. These are all great live, but not always necessary in the studio. Keep it tight and keep it simple, but don’t lose your style. Practice your fills until you can’t get them wrong, and if you do keep getting them wrong, change them up. Don’t go into the studio doing something your still not 100% confident on. My main rule to this is, if you can’t play it every time, don’t play it in the studio.
Also put time into the beats you think are the easiest too. The last time I was in the studio, one of the songs had a super straight tight beat. Hats opening and closing on the on and off beat, bass drum every off beat and snare on 2 and 4, super straight super easy. And I played through and recorded the whole song. Great! Then my producer, who is a good friend and the studio owner said something along the lines of ‘ah it’s that beat. I’ve had so many struggle with it as it’s a hard one to keep perfectly in time, it sounded great, but let’s do a few more takes…’ because the beat was such a straight, tight beat, any hit of the snare or bass drum that was slightly out of sync with the rest was super noticeable and muddied the whole thing.
I had never thought about it before, it was a simple part of the song. But as soon as he brought my attention to it, that was it. It had to be perfect and it became that fix, that part of the song that you dread and are so focused on, you tense up as its approaching. Every take after the first one was worse than the one before. Luckily the first take was a keeper, thank God, which brings me to my next point.

6.Relax and don’t over think it– you have now practiced these beats, these songs time and time again, you know them like the back of your hand so stop thinking about them and let your muscle memory take over. Be relaxed, enjoy yourself and enjoy the process. After all that’s why we play.
Its almost recording day. So just a few more things to think about.
- Preparing the kit. Firstly, discuss with your engineer what sound you are going for and the equipment you want to use. Most studios will have an in house kit so ask about this if you think your gear isn’t up to it. If you want to use your kit, re-skin and tune up before the big day. Don’t go in with well worn drum skins that are out of tune, too much time will be wasted trying to get them to any level of decent. But even if your kit has all new skins and sounds great, I would still say go in with an open mind and be willing to switch out equipment if its going to give you a better overall sound.
For example. I love my snare drum its my pride and joy, but the last time I was in the studio I didn’t use it. We sound checked it along with a couple of others and picked out which one sounded the best with the tone of the other drums (which were also mixed and matched between my gear and the studios) and for the sound we was going for, their snare just fit better. Listen to your engineers advice, they know what they’re doing and they want the recordings to be as good as you do.
8, Setting up takes time. Don’t be alarmed by the time it takes to set up and sound check, i promise you getting the sound at this point is worth all the time in the world. It will take a while for the engineer to mic up the kit, they will have their way of setting up but it will all be altered slightly for every drummer as we all set up and play differently, so give them time to do what they do best.
Then it comes to sound checking. The first thing is play like you’re going to play. This might sound daft but its easy to play at one level during a sound check then completely different when your running the songs, you want to hit the kit at the volume you are going to play at. Listen to what your engineer wants and when it comes to playing around the full kit, keep it simple. They are not judging you on the best drum solo in the world, they’re listening to the mics and making sure everything is being picked up at a consistent level. Which brings me to:
- Dynamics, pay attention to your technique. The microphones will amplify any slight variations in volume so focus on your attack and keep it consistent on each drum and cymbal. Also don’t worry too much in variations of volume in the songs, for example if you have a quiet verse, try playing these in line with the rest of the tune and not alter the volume too dramatically at the recording stage. This also helps if you need to drop in and retake parts, (see below)
- Start with the song you are most confident with. Once the first song is in the bag, you will relax into your session so much more. So start with the song that you are most comfortable with, the song that is easiest for you to play. I guarantee that if you start with the hardest one and then struggle to get a good take, it will throw off your game, and it is not easy to get out of that recording funk. But it happens, and it happens to everyone. So take a minute, get up from behind the kit and have a break. I guarantee when you come back, it will be easier!
- Don’t let your pride get in the way. Everybody wants to be a one take master. Get in, hit record, smash it and boom song done, over and out! I’m guilty of this myself. If I don’t get the whole song perfect in one take I’m a failure, what am I doing? How can I even call myself a drummer? Chill your boots matey! You know you can play, your band knows you can play; you wouldn’t be here if you couldn’t. But if you’re not used to recording, there is just something about that magical red record button that can make you feel like you’ve never seen a drum kit before. Record a few takes from start to finish, and if you get the whole song down in one take, amazing! But more than likely you will find that certain parts in certain takes may be better than others. Don’t be afraid of letting your producer take the best bits and merge them together. Nobody needs to know!
And lastly the most important thing:
- Enjoy it! I promise you there is nothing more exhilarating than spending time in the studio, but preparation before you go is key to a great recording session.